Texture Sampling
Texture sampling is the process of reading textures through the GPU. Graphics Hardware embeds a set of texture units that are able to read texture pixels directly or sample these textures using different algorithms.
Sampling Options
Texture sampling options are not texture options per-se but more configuration on how the shader needs to read the texture using its texture sampler.
These settings are often stored per-texture for pipeline convenience but it can lead to nonsense if the engine is not able to override these settings in shader graphs : it can lead to unnecessary importing multiple times the same texture with different addressing and filtering modes.
Addressing Mode (Wrap Modes)
Addressing Mode is the configuration of the sampler that handles the behavior out of the 0..1 UV range. Different Wrap modes can be set per-axis : Repeat (Wrap) , Clamp or Mirror.
Filtering Mode / Anisotropy Level
Filtering modes is the way your pixels will behave while being drawn on screen. Old devices (PlayStation 1) were not able for instance to perform texture filtering in order to blend one pixel color to another, the lack of filtering induced an effect of all pixels being visible. Modern engines can allow you to disable filtering at all what is called point filtering.
Bilinear filtering is a long known method that will blend the pixels of a texture horizontally and vertically so the transition between one pixel and another is smooth.
Bilinear Filtering is extremely fast but can lead to artifacts when used on objects set in perspective. Because the Graphics card will switch to lower Mip-Maps in the distance (see Texture Sampling section in shaders) : the transition between a Mip and another can appear hard as a visible line in the depth of your scene such as in the example below. (Some mip fading to plain gray were added in order to highlight this artifact even more).
Trilinear Filtering adds another dimension to the texture filtering by blending the already blended pixels from one Mip to another. This method is a bit more expensive but today well assumed for textures that need to be tiled over large distances.
Anisotropic Filtering enhances Bilinear and Trilinear filtering by increasing the samples used for the texture sampling in order to enhance the grazing angle blurring that occurs automatically when the GPU tries to fetch the correct mip-map based on view angle and distance.
sRGB/Linear
Often, the engine lets you set a sRGB/Linear flag on your textures. This flag is mainly used for texture samplers for reading color values. As your engine processes color in a linear way, your color textues have to be converted from Gamma Space (the visible color space, see Gamma / Linear rendering section) to linear space, in order for the lighting to be applied accurately and the colors to blend correctly.
This concept is really often confusing for the artists so if you have to decide if the texture has to be sRGB or Linear, ask yourself if the contained data are actual colors that you have authored in another software. If the answer is true, you’ll most likely have to use your texture as sRGB.
As there are some exceptions and a lot of cases where you could ask yourself about how to configure your texture, here is a table that you could use as reference. (Please note that specific features to your engine could invalidate its contents, so if you have a doubt, ask your CTO).
| Type | sRGB/Linear? | Comments |
|---|---|---|
| Albedo,ColorTint, EmissiveTint,SpecularTint | sRGB | All LDR Color and Tints, including specular are meant to be sRGB, for Emissive, only the tint has to be sRGB (if used in conjunction with a HDR Mask or value) |
| SpecularLevel,Roughness, Metallic | Linear | Physically-Based values are often mathematical values taken from an arbitrary range, and have to be treated as linear values. |
| HDR Color | Linear (sRGB in rare cases) | This case is tricky: By the book, HDR Values are meant to be treated as linear, absolute values. However, some software tend to apply a gamma curve for them to appear “gamma correct”, if you set up a process using HDR, avoid this kind of unneccessary correction and setup a linear export (see below) |
| Alpha mask | Linear | Alpha is meant to be linear to be correct. (if you activate sRGB on a texture, it will not be applied on alpha channel), so if you create a separate alpha channel, It will be meant to be linear |
| Vector Maps (Normals, FlowMaps, Distortion) | Linear | These maps are meant to be linear. In 8-bit the values are centered on 0.5 so no gamma correction has to be applied or the values will become off-centered. |
| ProgressMaps | Linear | Progression Maps have to be kept as linear, otherwise the progression will show a dampening effect. |
Mip-Mapping
When the texture is imported, the engine can generate a set of Mip-Maps for the imported texture. Every Mip-Map of a texture is a lower resolution version of the imported texture at half, quarter, eighth, 16th… of the initial resolution.
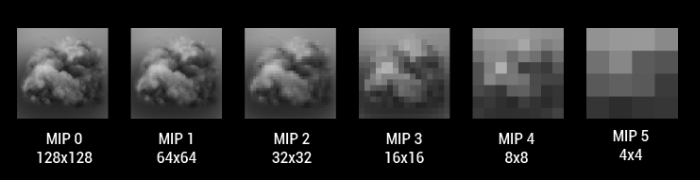
The point in using Mip-Maps is to reduce texture filter aliasing when texel/pixel ratio is greater than one (if the displayed texture is too dense for the final pixel density), these kind of artifacts were present on older consoles and showed a lot of noise on distant textures, because of the inability of the texture units to find a proper pixel value to read.
By using lower resolution textures, color data becomes blended and aliasing become reduced as the same pixel from the texture is read every time..
Performance Info: Using Mip-Maps is also useful to maintain a consistent texture cache usage and keep good performance. Disabling Mip-Maps on a texture induces texture cache stalls, a phenomenon where performance can degrade exponentially.
Sampling in Shaders
Samplers and Textures
Samplers and Texture are two distinct elements when it comes to read textures in shaders. Textures are data containers (N Dimensional Arrays of pixels (1D/2D/3D/...)) while Samplers are GPU Objects that contain settings in order to Sample a texture. Every one of these settings is called a Sampler State.
Sampler states allows to control over filtering, out of range coordinates, mipmap control, texture array controls, or sRGB/linear handling.
Depending on your engine, some, many or most of these options are hidden or wrapped under more artist-friendly options in order to maintain good quality and performance
Texture Wrapping Mode
Texture Wrapping Mode handles how to read texture when using out-of range (0..1) coordinates. Basically a texture read in the 0..1 range will be read as-is and will wrap every unit of coordinates using a Wrapping mode named Repeat, Some engines will allow you to Clamp so the latest pixel of the texture will repeat indefinitely after the edge of the texture, or even Mirror.

Addressing mode can be set per-axis using the ADDRESSU, ADDRESSV, and ADDRESSW states but often, game engines lets you choose this setting once for all axises (some also provide per-axis as an advanced setting).
Addressing modes can be set using a CLAMP (clamps coordinates between 0.0 and 1.0), REPEAT (Wrapping the texture out of range), or MIRROR (flips the axis every odd and even).
Texture Filtering
Filtering can be adjusted in various ways, depending on the Texel/Pixel ratio. Three filtering modes can be adjusted depending on various cases : When enlarging : MAGFILTER is used when the Texel/pixel ratio is < 1.0, When the Texel/pixel ratio is > 1, we use MINFILTER to set it when the kernel is shrunk down. In the case of using mip-maps, the MIPFILTER can be used to blend between mip-maps (thus enabling tri-linear filtering)
Filtering modes can be set to POINT (No filtering), LINEAR (Smooth) and ANISOTROPIC. The latter relies on view angle to filter using different (higher) mip-maps.
For Further reading : See Filtering Mode/Anisotropy Level
Mipmap Control
When reading a texture, provided coordinates will help the GPU determine which mip to read depending on the texel/pixel ratio and the view angle. Mip-maps are selected automatically to be used using a tex2D(s,t) operation.
Tex2D is the auto-mip function that will read a texture using its sampler s and coordinates t. This function is meant to be used in pixel shader only as the rasterization will determine the UV coordinate screen space derivative (how much UV changes from one pixel to its neighbor). For more information, see the tex2d section below.
Texture Array slice Index
Texture objects can be of many dimensions (1D, 2D, 3D, Cube) but can also be stored into Texture Arrays, using the slice index enables the user to select which element of the array of textures you want to read from.
sRGB/Linear Sampling
sRGB/Linear Sampling flag enables the texture sampler to apply inverse-gamma correction for sRGB Textures (or not in the case of linear textures such as Motion Vectors, Masks or Normals).
sRGB Sampling roughly applies the inverse function of the gamma correction in order to transform all color data into linear data that is mathematically correct for blending, lighting computations or even simple display.
For more information see Color Correction
Sampling Coordinates
In order to sample a texture using a sampler, a set of coordinates need to be provided.
UV Coordinates
UV and UVW Coordinates are the artist-friendly name of the mesh texture coordinates, a set of values stored per-vertex that correlate a particular vertex in a 2D Texture Space. These coordinates are used for texture mapping.
Texture Coordinates (UV) are stored in the mesh data for every vertex. Some software enable storing many different texture coordinates for the same geometry. Every set of coordinates is set in a different Texture Coordinate Channel.
World Coordinates
Sometimes, placing many object in the world require these objects to have continuous mapping from one instance to another. In order to sample these coordinates, we do not require any Texture Coordinate Channel.
World coordinates can be used for :
- Tiling textures over great distances
- Provide seamless continuity across objects
- Add world-space detail and variation over objects
Screen-Space Coordinates
Screen Space coordinates are a way to map textures in screen-space. These coordinates are aligned to the screen rectangle:
- With the origin being in the top (or bottom) left corner, stretching up to 1 in every direction (horizontal and vertical)
- With its origin being in the center of the screen, and coordinates stretching between -1 and 1 in every direction (horizontal and vertical)
Lookup Coordinates
Lookup Coordinates is a custom way to sample a texture. Instead of using coordinates, we can use anything to sample a texture : time, exposed shader property, textures.
Using a texture value as a lookup coordinate enable performing Gradient Mapping : using this black and white value interpreted as coordinate (0 = black, 1= white), we can sample a texture (namely a Look-Up Texture or Look-Up Table) to remap the value.
Deforming Sampling Coordinates
Deforming Sampling Coordinates enable performing distortion on textures. This concept assumes that you mix texture coordinates and values sampled from a texture as deforming weights.
For instance adding the values sampled from a normal map to the texture coordinates will deform the coordinates based on the tilted angles.
Shader Sampling Instructions
Sampling a texture in shaders can be achieved using:
- The direct access to the texture array of pixels : texture load
- Access to filtering, mip-maps and other features through texture samples
Declaring Textures and Samplers
sampler2d sampler;  // declaring a sampler
texture2d texture;  // declaring a texture
Sampler Declaration and Options
Very often, texture reads are made through a texture sampler that is bound to the texture. It is an object created when the texture is imported, and bound automatically to the shader by the engine.
Samplers hold a configuration for reading textures:
-
Addressing Mode (Clamp, Wrap, Mirror, ...) per axis
-
Filtering options (Filter Mode, Anisotropy)
- sRGB/Linear
- Optionally : a reference to its texture. Because it's optional, generic samplers can be created and use with various textures.
Texture.Load() instruction
In HLSL a Texture.Load() is achieved by providing a reference to the texture and a uint3 integer vector containing the following:
- X,Y : pixel coordinates of the pixel
- Z : mip level which we want to read from
The prototype of a Texture Load is as follows
float4 t.Load(uint3 coord);
- Texture Load is also compatible with Compute Shaders
tex2D(), tex2Dlod(), tex2Dbias() instructions
In HLSL, these 3 functions will access a texture's data for a given coordinate, based on three different computations of mip-maps:
- tex2d will determine the correct mip-map based on rasterization texel density.
- tex2dbias will determine the correct mip-map based on rasterization texel density and will apply a bias on it
- tex2dlod will not determine automatically the mip-map but instead will use the one specified
tex2d and tex2dbias can only be used in pixel shaders because of their needs of screen-space UV derivatives, which are computed during rasterization, see next section for more information.
Determining correct Mip-Maps
tex2d and tex2dbias are functions that can only be called in pixel shaders, because of their need of knowledge of texel density. During rasterization, texture coordinates are interpolated from the values stored in vertices, and, depending on the size of the triangle on screen, and the uv space visible, a UV derivative will be computed.
The UV Derivative is a per-pixel value that tells how much UV coordinate changes from one pixel to its neighbors. When applying this mapping using a texture, the hardware can tell the texel per pixel ratio.
While the ideal case would be 1 Texture Texel per Screen Pixel, it is rarely the case in 3d graphics, due to perspective and shapes in the space. By computing the derivative, depending on how close to the camera is the part of geometry being rendered, the correct mip-map will be chosen.
Failing to do so would imply to use a higher definition mip-map for the current pixel, and would lead into two major problems:
-
Texture Aliasing : by having a Texel/pixel density ratio greater than one, it means that one pixel of the screen is supposed to draw a part of a texture that is composed of more than one pixel, for example an area of 8 by 8 pixels. In this case, the texture sample will have to decide of one pixel out of these 64 to get, but this value will not be an average of the 8 by 8, and so it will lead into texture aliasing.
-
Texture Cache Stall : in addition to texture aliasing, a texture cache stall will happen for texel/pixel ratios greater than one. Short version of this issue is the GPU needs to put in cache more memory than it's able to, so it will do it several times, slowing down the execution of the shader. For more information, this performance pitfall is detailed more in the Performance section.